This is part two of my series of posts detailing the rendering of planets in War Worlds. Last time, we started rendering a basic sphere using a very simple ray-tracer. This time, we're going to start work on texturing that sphere.
We're really just laying the ground-work here, getting ready for things to come. In particular, we're going to come up with a way to generate what's known as a delaunay triangulation of random points, and the corresponding Voronoi diagram. Why, you ask? Well, that will all become clear in the next part :-)
Point Cloud
First of all, to generate a delauny triangulation, you need a "point cloud" -- a square of randomly-generate points. The most obvious way to generate such a set of random points is just to generate random x- and y- coordinates. In fact, here's some code that does just that:
PointCloud pc = new PointCloud();

int numPoints = 200; // or some number...
Random rand = new Random();
for (int i = 0; i < numPoints; i++) {
    Vector2 p = new Vector2(rand.nextDouble(), rand.nextDouble());
    pc.mPoints.add(p);
}
This code uses my helper Vector2 class to hold an instance of a 2D-point and my PointCloud class that holds a collection of Vector2 points. I define my point cloud to only contain points between (0,0) and (1,1) which simplifies things a little later on.
But this produces... unsatisfying results:
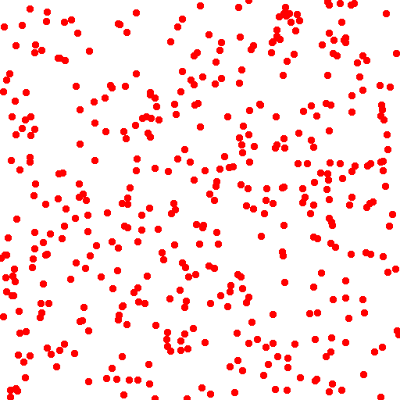
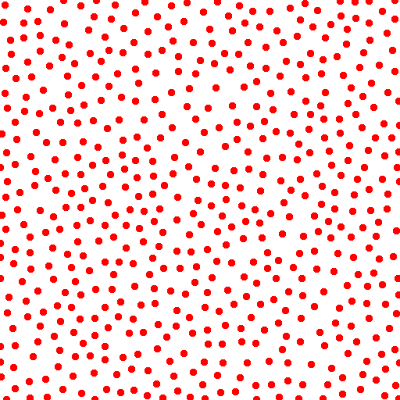
As you can see, the points are kind of clumped together and they don't look very attractive. You may remember a post I had a while ago where I was talking about exactly this problem with the randomly-generated starfield. You may also remember that I solved the problem using a Poisson distribution function. Well, the same thing can be used here to generate some nice-looking, random-but-approximately-evenly-distributed points:
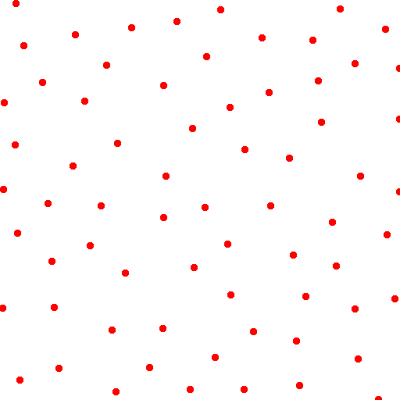
The code to generate a poisson distribution is actually fairly simple, conceptually. You start with a single point, then you generate a whole bunch of points around that point a random distance and rotation away. Then you throw out all the ones that are too close together, and you keep generating new points from each of the ones you just generated. Here it is in code form:
// start with a single random point
List<Vector2> unprocessed = new ArrayList<Vector2>();
unprocessed.add(new Vector2(mRand.nextDouble(), mRand.nextDouble()));

// we want minDistance to be small when density is high and big when
// density is small.
double minDistance = 0.001 + ((1.0 / mDensity) * 0.03);

// packing is how many points around each point we'll test for a new
// location. A high randomness means we'll have a low number (more
// random) and a low randomness means a high number (more uniform).
int packing = 10 + (int) ((1.0 - mRandomness) * 90);

while (!unprocessed.isEmpty()) {
    // get a random point from the unprocessed list
    int index = mRand.nextInt(unprocessed.size());
    Vector2 point = unprocessed.get(index);
    unprocessed.remove(index);

    // if there's another point too close to this one, drop it
    if (inNeighbourhood(pc.mPoints, point, minDistance)) {
        continue;
    }

    // otherwise, this is a good one, add it to the final list
    pc.mPoints.add(point);

    // now generate a bunch of points around this one...
    for (int i = 0; i < packing; i++) {
        Vector2 newPoint = generatePointAround(point, minDistance);
        if (newPoint.x < 0.0 || newPoint.x > 1.0)
            continue;
        if (newPoint.y < 0.0 || newPoint.y > 1.0)
            continue;

        unprocessed.add(newPoint);
    }
}
As you can see, we start with a single random point, add it to an "unprocessed" list. Then, for each point in the list we make sure no other points in the "final" list are too close to it (as defined by the minDistance parameter). inNeighbourhood is a simple O(n) function like so:
private boolean inNeighbourhood(List<Vector2> points, Vector2 point,
                                double minDistance) {
    for (Vector2 otherPoint : points) {
        if (point.distanceTo(otherPoint) < minDistance) {
            return true;
        }
    }

    return false;
}
Yeah, not very efficient. Once we're happy with the point, we add it to the PointCloud, and then generate a bunch of points around it using generatePointAround. A quick check that the newly generate points are in the valid range and we add them to the "unprocessed" collection.
private Vector2 generatePointAround(Vector2 point, double minDistance) {
    double radius = minDistance * (1.0 + mRand.nextDouble());
    double angle = 2.0 * Math.PI * mRand.nextDouble();

    return new Vector2(point.x + radius * Math.cos(angle),
                        point.y + radius * Math.sin(angle));
}
The new points are generated radius distance from the existing point (you can see radius will range from minDistance to minDistance * 2), and random direction from 0 to 2π.
The parameters mDensity and mRandomness are parameters I can tune to generate a different set of points. Here's another set of points, where I've turned the density up (and hence minDistance down):
Delaunay Triangulation
So we have our nice point cloud, next we want to triangulate that into a series of triangles. For that, we use a technique called the Delaunay triangulation. While researching this, I learnt a new word today: circumcircle. Basically, the circumcircle of a collection of points is a circle that touches each of the points. For a triangle, three points, there's guaranteed to be exactly one circumcircle (for more points, it may be impossible to circumcircle all of the points).
I'll admit that I pretty much just took the code below directly from here, rather than working it out on my own. If you really want to work out how to calculate the circumscribed circle of a triangle, the wikipedia page on the subject describes how it works pretty succinctly.
private void calculateCircumscribedCircle() {
    final double EPSILON = 0.000000001;

    if (Math.abs(v1.y - v2.y) < EPSILON && Math.abs(v2.y - v3.y) < EPSILON) {
        // the points are coincident, we can't do this...
        return;
    }

    double xc, yc;
    if (Math.abs(v2.y - v1.y) < EPSILON) {
        final double m = - (v3.x - v2.x) / (v3.y - v2.y);
        final double mx = (v2.x + v3.x) / 2.0;
        final double my = (v2.y + v3.y) / 2.0;
        xc = (v2.x + v1.x) / 2.0;
        yc = m * (xc - mx) + my;
    } else if (Math.abs(v3.y - v2.y) < EPSILON ) {
        final double m = - (v2.x - v1.x) / (v2.y - v1.y);
        final double mx = (v1.x + v2.x) / 2.0;
        final double my = (v1.y + v2.y) / 2.0;
        xc = (v3.x + v2.x) / 2.0;
        yc = m * (xc - mx) + my;
    } else {
        final double m1 = - (v2.x - v1.x) / (v2.y - v1.y);
        final double m2 = - (v3.x - v2.x) / (v3.y - v2.y);
        final double mx1 = (v1.x + v2.x) / 2.0;
        final double mx2 = (v2.x + v3.x) / 2.0;
        final double my1 = (v1.y + v2.y) / 2.0;
        final double my2 = (v2.y + v3.y) / 2.0;
        xc = (m1 * mx1 - m2 * mx2 + my2 - my1) / (m1 - m2);
        yc = m1 * (xc - mx1) + my1;
    }

    centre = new Vector2(xc, yc);
    radius = centre.distanceTo(v2);
}
You can see at the end of this function, we get the centre and radius of the circumscribed circle of a triangle defined by v1, v2 and v3. So how do we use this to generate a delaunay triangulation? The easiest way to generate a delaunay triangulation is to start with an already-generated triangulation, and add vertices to it one by one. So let's say we have the following triangulation, and we're trying to add the red dot in the middle:
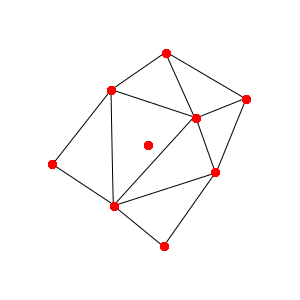
The first thing we need to do is gather all of the triangles whose circumcircle encloses the new point. You can visualize this like so:
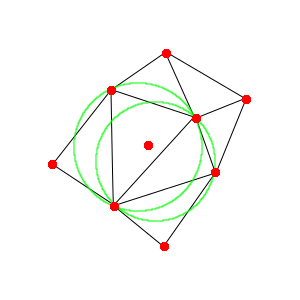
You can see the point is enclosed by two of the circumcircles. So these two triangles are the ones we're interested in. We need to take these two triangles out of the triangulation, then we need to separate out all of the "outside" edges. This is actually pretty simple: the outside edges are all of the ones that are not doubled-up. This picture can hopefully visualize that:
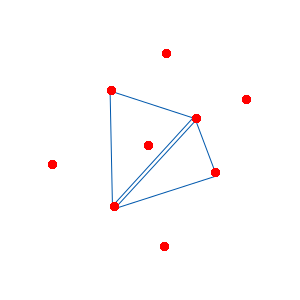
So we remove the double-up edges and we're left only with "outside" edges of this polygon. Simple connect each edge to the new point and we're done:
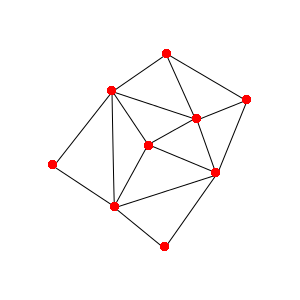
The only question is, if you've just got a point cloud, how do you start out? Easy: create two "super triangles" that enclose all of the points in your point cloud and start adding points from there. Once you're done, you need to remove all triangles which share an edge with the "super triangle".
Here's the algorithm in code form:
public void generate() {
    ArrayList<Triangle> triangles = new ArrayList<Triangle>();
    List<Vector2> points = mPointCloud.getPoints();

    // first, create a "super triangle" that encompasses the whole point
    // cloud.
    List<Triangle> superTriangles = createSuperTriangles(points, triangles);

    // go through the vertices and add them...
    for (int i = 0; i < points.size(); i++) {
        addVertex(points, triangles, i);
    }

    // now go through the triangles and copy any that don't share a vertex
    // with the super triangles to the final array
    mTriangles = new ArrayList<Triangle>();
    for (Triangle t : triangles) {
        boolean sharesVertex = false;
        for (Triangle st : superTriangles) {
            if (st.shareVertex(t)) {
                sharesVertex = true;
                break;
            }
        }

        if (!sharesVertex) {
            mTriangles.add(t);
        }
    }
}
I hope createSuperTriangles is obvious, so I won't go into detail. Basically, I just create two triangles that wrap the whole set of points (which is easy for me because I know my points all lie in the range (0,0) to (1,1). The addVertex method is the heart of the algorithm:
private void addVertex(List<Vector2> points, List<Triangle> triangles,
                       int vIndex) {
    Vector2 pt = points.get(vIndex);

    // extract all triangles in the circumscribed circle around this point
    ArrayList<Triangle> circumscribedTriangles = new ArrayList<Triangle>();
    for (Triangle t : triangles) {
        if (t.isInCircumscribedCircle(pt)) {
            circumscribedTriangles.add(t);
        }
    }
    triangles.removeAll(circumscribedTriangles);

    // create an edge buffer of all edges in those triangles
    ArrayList<Edge> edgeBuffer = new ArrayList<Edge>();
    for (Triangle t : circumscribedTriangles) {
        edgeBuffer.add(new Edge(t.a, t.b));
        edgeBuffer.add(new Edge(t.b, t.c));
        edgeBuffer.add(new Edge(t.c, t.a));
    }

    // extract all of the edges that aren't doubled-up
    ArrayList<Edge> uniqueEdges = new ArrayList<Edge>();
    for (Edge e : edgeBuffer) {
        if (!e.isIn(edgeBuffer)) {
            uniqueEdges.add(e);
        }
    }

    // now add triangles using the unique edges and the new point!
    for (Edge e : uniqueEdges) {
        triangles.add(new Triangle(points, vIndex, e.a, e.b));
    }
}
So we're using my Triangle and Edge helper classes. These two classes contain indices in the points collection of their vertices. The Triangle.isInCircumscribedCircle() method uses the centre and radius of the circumscribed circle I calculated above.
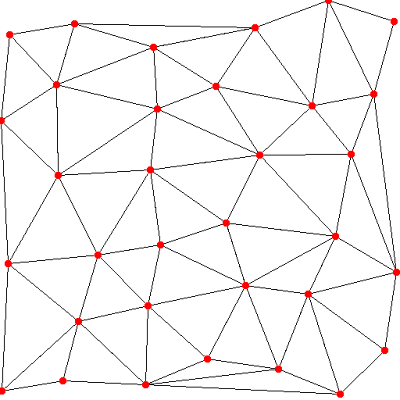
So once all of that is done, I can generate images such as this:
Voronoi diagrams
Voronoi diagrams are simply a different representation of the same data you get from the delaunay triangulation. A voronoi diagram is calculated by taking a point from the point cloud, then looking at each triangle attached to that point. Connect up the circumcircles of each of those triangles and you've got one cell of the voronoi diagram. Here's a picture:
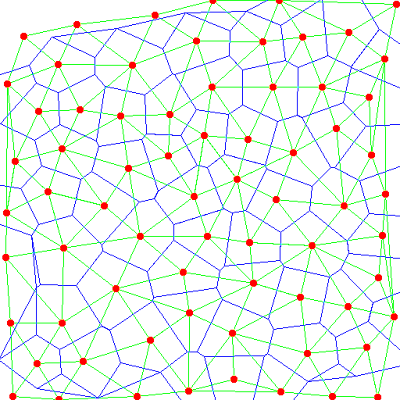
The green lines are the delaunay triangulation, the blue lines are the voronoi diagram. In my code, the only special thing I store for the Voronoi diagram is a mapping of points to the triangles that share that point as a vertex. Then it's a matter of drawing the Voronoi diagram like so:
public void renderVoroni(Image img, Colour c) {
    for (Vector2 pt : mPointCloud.getPoints()) {
        List<Triangle> triangles = mPointCloudToTriangles.get(pt);

        for (int i = 0; i < triangles.size() - 1; i++) {
            img.drawLine(c, triangles.get(i).centre,
                         triangles.get(i+1).centre);
        }
        img.drawLine(c, triangles.get(0).centre,
                     triangles.get(triangles.size() - 1).centre);
    }
}
The main tricky part about this code is that it assumes the triangles are sorted in clockwise (or counter-clockwise) order. That is, drawing from triangles[0] to triangles[1] to triangles[2] etc will draw the outline of the cell. That just took a bit of finagling of the triangles when I added them to the mapping, but nothing too complicated. In fact, for normal usage the finagling isn't really needed, you can just take the triangles in any old order, it's only needed to get the display correct.
Tweaking the parameters
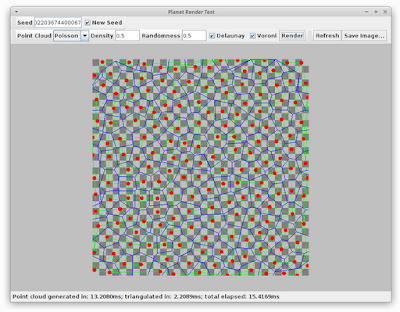
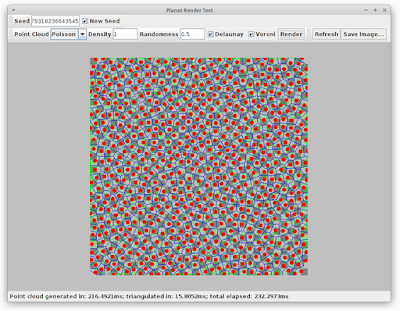
And this brings us back to the little test application I was working on yesterday. I've added a few more controls so that now I can generate all the images from this post on-demand. I can tweak the various parameters and see just how it all turns out. Here's some examples:
Different parameters:
You can see even with the maximum "density", the total elapsed time is still under a quarter of a second. That's not great, but in reality I expect the top screenshot (with density set to 0.5) to be much more useful. Another thing I've noticed is that setting the "randomness" higher (e.g. 1.0) doesn't make much difference to the overall quality but has significantly better performance.
In any case, the place to optimize here is obviously the point cloud generation -- the triangulation code, for all it's inefficiency, is still much faster.
One other point, there's something funny going on at the edges of my voronoi diagrams. It looks like this is related to the fact that points at the edges have nicely enclosing triangles. It's not a huge problem, since I can hide the edges of my texture maps in the game, but maybe something I should look into if I get a chance.
Next time
Coming up next time, we'll look at what we can actually do with voronoi diagrams. For some hints, you might want to check Google image search to see what others have been doing.
Series Index
Here are some quick links to the rest of this series:

